Tips for Using Excel in Office 365

sc1_tip2_headerLet your data tell a story

With Office 365 you can easily tell the story of your data. Perform complex tasks quickly, visualize your data to understand it better, and share your workbooks for better results.

csc-sc1-tip2_photo1_@2xAnalyze your data instantly

Discover and compare different ways to represent your data visually then apply formatting, sparklines, charts, and tables with a single click.

Learn more

csc-sc1-tip2_photo2_@2x
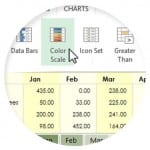
Get a better picture of your data

Let Excel recommended the charts that best illustrate your data’s patterns. Quickly preview your chart and graph options, then pick the ones that present your insights most clearly.

Learn more

csc-sc1-tip2_photo3_@2xLet Excel work for you

Save time as Excel learns your pattern and auto-completes remaining data. No formulas or macros required.

Learn more

For more information on Office 365 at SMU, please visit our webpage http://www.smu.edu/BusinessFinance/OIT/Services/o365.

O365 for SMU Students

sc1_tip1_headerA better way to work for SMU students

With Office 365, you can read, write, collaborate, and present ideas—from virtually anywhere with consistent, clean, and fast experiences.

Simplify sharingcsc-sc1-tip1_photo1_@2x

Your files are saved online, so you can send everyone a link to the file where updates can be made together, at the same time.

Learn more

csc-sc1-tip1_photo2_@2xZoom in with PowerPoint

Direct your audience’s attention right to your point in your PowerPoint presentation. Zoom in on a diagram, chart, or graphic with a couple of clicks, and zoom out just as smoothly.

Learn more   

csc-sc1-tip1_photo3_@2xA PDF time-saver you’ll love

Open a PDF in Word on your desktop, and you can edit content as if you created it in Word.

Learn more   

OneDrive for Faculty, Staff, & Students

one driveIn case you haven’t heard, OneDrive is now available for all SMU faculty, staff, and students! What does that mean? OneDrive for Business is a Microsoft online service that provides resources for file storage, collaboration, and communication. Students and Employees receive unlimited space. All files that you store in OneDrive are private initially. However, you can easily change the permissions of the files to share them with other individuals (both at SMU and externally). The single-item file size upload limit is 10GB. You can also access and synchronize files easily on multiple devices.

Sounds great! How do I access my OneDrive?

  1. Visit http://office365.smu.edu and click Login.
  2. Enter your SMU email address using the @smu.edu format (user@smu.edu).
  3. You will automatically be redirected to the SMU Office365 login page.
  4. Enter your SMU email address using the @smu.edu format and your mySMU password.
  5. Click Sign In.
  6. Click OneDrive from the top menu bar. The first time you click on OneDrive, you may see a message that indicates your account is being activated. That process takes a few minutes to complete.
  7. You can use the OneDrive service from the browser window. Once you have initially launched one drive, it should also be a default save option without your Microsoft Office applications. You can also download the OneDrive Sync application onto your computer. This will automatically backup files saved to a specified location to your OneDrive account.

Office Time Saver: Using Groups in Microsoft Outlook

I was just composing an email to a number of people I will be writing on a regular basis. Rather than reinserting each individual or wasting time searching for that last sent item and forwarding to all, I decided to create an Outlook group. It takes a few seconds to set up, and if you communicate on a regular basis with a particular group of people, this trick can save you a lot of time.

New Contact GroupTo begin, navigate to your Outlook contacts (People). From the Home tab, select New Contact Group.  Select Add Members and choose the appropriate Address List. Next, name your group and click Save and Close.

When you are ready to write your group, select the To…button, under the address book select Contacts. Next, go to the name of your group, double-click  and click OK.

Your group will display in your email and is available for you to use whenever you need it!

study

You can easily edit or delete a group by going to your contacts and searching for the group. Once you find the group, right click on the name and select Edit or Delete.

Capturing Screenshots in Office

To follow along with last week’s post we wanted to give you a few tips on using screenshots in the Microsoft Suite.

From the Insert tab (available in all of the Office products), select the Screenshot screenshoticon.  Microsoft gives you two options you can use to insert an image. Click on the drop down arrow and either select Available Window, which gives you the option to insert another window into your document like in the example below: blog screenshot

screen clipping
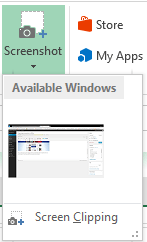
Or, you can insert a Screen Clipping, which allows you to select the specific item you want to insert. First, click on the window you want to grab the screenshot from to make the window active. Next, go back to the Office product you want to insert the screenshot into. Select the Screenshot icon and select Screen Clipping, the window that you were previously on will gray out.

The cursor will change to a cross +. Left click and select the area you want to insert. Here, I selected just the clip I wanted.

5 decades
That’s our quick tip of the day.  Happy screen clipping!