
Over the summer, Microsoft released its latest versions of the Microsoft Office Specialist exams: Microsoft 365 Apps Associate and Microsoft 365 Apps Expert. Starting this semester, anyone interested in certifying with OIT will be offered the Microsoft 365 Apps exam, with the exception of the Outlook Associate exam, which is currently only available in the 2019 version.  Continue reading Introducing the New Microsoft 365 Apps Exams
Category: Word
Microsoft Office Certification: It’s As Easy As 1,2,3
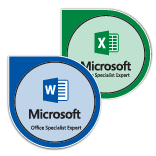 In today’s market, standing out amongst the competition can be tricky. Employers are looking for candidates who not only have the appropriate educational background and experience but also possess skills that can produce immediate organizational impact. A Microsoft Office Specialist Certification is a simple opportunity to add globally recognized value to your resume. At SMU, students, staff, and faculty alike can gain a Microsoft Office Specialist Certification to endorse their proficiencies in all Microsoft Office applications, proving to employers they have what it takes to make an immediate impact in their career. Achieving certification is as easy as steps 1, 2, and 3.
Continue reading Microsoft Office Certification: It’s As Easy As 1,2,3
O365 for SMU Students
 A better way to work for SMU students

With Office 365, you can read, write, collaborate, and present ideas—from virtually anywhere with consistent, clean, and fast experiences.
Simplify sharing

Your files are saved online, so you can send everyone a link to the file where updates can be made together, at the same time.
 Zoom in with PowerPoint

Direct your audience’s attention right to your point in your PowerPoint presentation. Zoom in on a diagram, chart, or graphic with a couple of clicks, and zoom out just as smoothly.
 A PDF time-saver you’ll love

Open a PDF in Word on your desktop, and you can edit content as if you created it in Word.
Capturing Screenshots in Office
To follow along with last week’s post we wanted to give you a few tips on using screenshots in the Microsoft Suite.
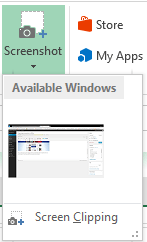
From the Insert tab (available in all of the Office products), select the Screenshot  icon. Microsoft gives you two options you can use to insert an image. Click on the drop down arrow and either select Available Window, which gives you the option to insert another window into your document like in the example below:
 Or, you can insert a Screen Clipping, which allows you to select the specific item you want to insert. First, click on the window you want to grab the screenshot from to make the window active. Next, go back to the Office product you want to insert the screenshot into. Select the Screenshot icon and select Screen Clipping, the window that you were previously on will gray out.
The cursor will change to a cross +. Left click and select the area you want to insert. Here, I selected just the clip I wanted.

That’s our quick tip of the day. Happy screen clipping!
Discover New Features in Microsoft Word (Part 2)
 By Rachel Mulry
In Part 1 of this article, we discussed Quick Parts, creating your own templates, and the Screenshot tool. Today we’ll continue with two powerful Word features.
- Navigation view:
 If you use the styles in Word, not only can you create a consistent polished document, but you can also use the Navigation view to help rearrange and jump to various portions of the file quickly. You can enable navigation view from the View menu, or you can simply click on the page number in the bottom left corner of the screen. There are three options in the navigation panel. Viewing by headings allows you to view the overall structure of your document but also allows you to reorder the sections in a document simply by dragging and dropping! The page view displays a thumbnail image of each page in the document. You can jump to the desired page by clicking the thumbnail. The results view allows you to search for words, images etc in your document and then navigate to each instance where that search term was detected. To turn off the navigation view, just click on the page number on the bottom left and you’re back to full screen view of your document.
  Available actions properties: I admit I stumbled across this nifty feature while I was writing this article!
By default, the available actions menu is turned off. However, once it is enabled it will allow you to right click on certain types of data and select from additional options. For example, you could right click on a data and create a calendar appointment! Or right click on an email address and add it to your Outlook contacts. To enable this feature, click File—Options—Proofing— AutoCorrect. Click the Actions tab. Then check “enable additional actions in the right-click menu”. Select the types of data that you wish to enable these actions. Click OK. When you are viewing or creating a document, simply right click on the text and a new “additional actions” field will appear.
These are just a few of the many powerful features in Word. There are so many others waiting to be discovered! So be adventurous! Click through those menus on the ribbon or view a few new tutorials to discover something new in Word today!
