
Planning for this fall’s student technology workshops has been underway for several months now. This semester, our continued partnership with the Altshuler Learning Enhancement Center (A-LEC) will be expanded with several new course offerings as part of their Learning Strategies Workshop Schedule. One workshop we are particularly excited about is Digital Note-Taking & Textbook Reading. This 2-in-1 workshop will be jointly hosted by members of the A-LEC and IT Training Team. Continue reading Upcoming Student Technology Training
Category: Excel
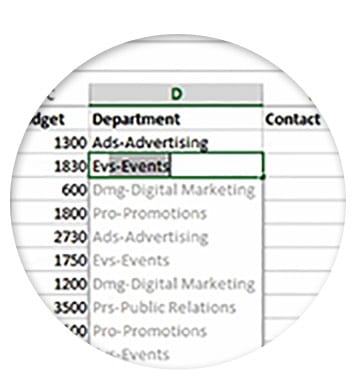
Response to Excel Survey
 At the end of February, we sent out a survey to all SMU staff regarding their interest in Excel training. This survey was created as all of our Spring sessions were filled to capacity the same day registration was announced! We also had a number of staff inquire about attending student-only sessions. However, those sessions were also heavily attended; therefore, we could not meet staff requests for attendance.
In order to accommodate both staff and student requests, we have increased our class offerings. Four additional Excel training sessions will be offered this fall for students. Eleven Excel sessions will be delivered this spring marketed primarily to SMU Staff. Visit our website to register for one of the newly added Excel sessions. Continue reading Response to Excel Survey
Excel for Windows Tips and Shortcuts Webinar
Boosting Your Efficiency and Productivity
Offered by Lynda.com

Explore Microsoft Excel tips and shortcuts you can use every day on a Windows operating system. Join Dennis Taylor, spreadsheets expert and lynda.com author, to unlock techniques for navigating, copying and pasting, writing formulas, entering data, creating charts, and formatting.
This webinar will discuss:
- Keystroke combinations
- Toolbar and menu options
- Cells, columns, rows
- And more
- Q&A session to follow.
All registrants are provided with a recording of the webinar and the slide deck after the event.
Webinar details:
- Thursday, May 21, 2015
- 11 a.m. to noon PT
- 2 to 3 p.m. ET
- FREE
Speaker: Dennis Taylor
Dennis Taylor has more than 25 years of experience working with spreadsheet programs as a book and tutorial author, speaker, seminar leader, and facilitator. Since the mid-1990s, he has been the author or instructor of numerous Excel video and online courses, and has traveled throughout the US and Canada presenting more than 300 seminars and classes.
Dennis has written and co-authored multiple books on spreadsheet software, and has presented more than 500 Excel webinars. He has worked with hundreds of corporations, government agencies, colleges, and universities. He lives in Boulder, Colorado.
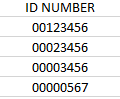
4 easy steps to keep the leading zero in Excel!
When working on spreadsheets you might have a need to have a column that has leading zeros. For example, let’s use an ID number, if I was to input the beginning of my id “0010” Excel would automatically remove the first two zeros. Here’s how to keep the leading zero in Excel:
- Right-click on the column you want the leading zero, and select Format Cells.
- Select Custom from the category list.
- In the Type field, enter how many digits you need. The SMU ID is 8 digits which we will use in our example below. (Note: You do not need to add quotes to the string.)

4. Click OK. The column will now utilize the format you created!
Tips for Using Excel in Office 365
 Let your data tell a story

With Office 365 you can easily tell the story of your data. Perform complex tasks quickly, visualize your data to understand it better, and share your workbooks for better results.
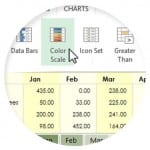 Analyze your data instantly

Discover and compare different ways to represent your data visually then apply formatting, sparklines, charts, and tables with a single click.
 Get a better picture of your data

Let Excel recommended the charts that best illustrate your data’s patterns. Quickly preview your chart and graph options, then pick the ones that present your insights most clearly.
 Let Excel work for you
Save time as Excel learns your pattern and auto-completes remaining data. No formulas or macros required.
For more information on Office 365 at SMU, please visit our webpage http://www.smu.edu/BusinessFinance/OIT/Services/o365.
