Classroom Support Enhancements

In addition to upgrading the technology equipment in several classrooms, we are also working on a few new processes to provide quicker response to classroom calls as well as keep faculty informed of maintenance issues in their classrooms.

Emergency Response:

  • We currently have 4 full time staff on the AV/Event Support team.  These individuals are currently serving as first responders to classroom calls.  They also have a team of student workers and the OIT Desktop Support team to assist as backup.
  • As we implement the shared services model in IT, there will be embedded desktop support technicians throughout campus.  These individuals will be responsible for providing quick classroom response due to their location.  They will continue to be dispatched from the Help Desk, but can provide a quicker response time as they will be in near proximity of the classrooms in their area.

Classroom Maintenance

  • When classroom technology fails and requires maintenance, the AV team will first attempt to install temporary equipment in the room that day to be used until the room is unoccupied for maintenance to occur.  Carts are being compiled with the necessary equipment and will be stored in various buildings on campus.
  • The AV team is implementing a notification process to alert any faculty that are teaching in an impacted classroom of the technology issue and if temporary equipment is available.  The faculty will be notified via email throughout the fulfillment of the maintenance activities.
  • A webpage has been built which will automatically display a list of any classrooms that are currently under maintenance as well as a status of these rooms. The information is available at www.smu.edu/BusinessFinance/OIT/classroommaintenance
  • We are also in the process of implementing new management tools to provide reporting, health checks and possibly even remote capabilities for the classroom equipment.  As these tools are implemented, many issues can be prevented or resolved quickly without dispatching a technician.

Finally, we realized that our instruction sheets in the classroom were not updated following the upgrade of equipment in several rooms.  We are working on new instructions and will ensure that these are accurate and available in all classrooms quickly.

We will continue to look for opportunities to improve our classroom response service as it is a critical component for instruction!

Classrooms Get Upgrade Over Summer

During the last few weeks of summer, several classrooms in Dallas Hall have been given a much needed upgrade.

2015-09-02_11.53.14Faculty teaching in these rooms will now notice that HDMI is an available source and the black AV box has been moved into the lectern to give you more room to stand. We’ve also re-designed the keypad interface so users can select a laptop input just by pressing a single button. (Previously it was necessary to also make a selection on the small switcher that was under the keyboard tray.) If you want to use your laptop, simply choose VGA or HDMI on the familiar keypad and plug in the appropriate cable. These rooms have also been given new projectors that provide a brighter, clearer image.
Continue reading Classrooms Get Upgrade Over Summer

Faculty Media Lab to close during renovations

OIT’s Faculty Media Lab will close on July 23 for the duration of the CUL renovations. The Faculty Media Lab has provided dozens of faculty with a space for multimedia projects, digitizing, and multimedia training.

While the space will be closed, the assistance provided will continue through other areas on campus. General multimedia question and assistance can be obtained by contacting the OIT Help Desk at 214-768-HELP or help@smu.edu. The SMU STAR Program will still continue to work on faculty and department digital media projects; Please continue to make requests though the help ticket system. For digitizing needs, please contact the CUL’s Norwick Center for Digital Services for availability and assistance.

What to Do when PowerPoint’s Presenter View Won’t Play Nice

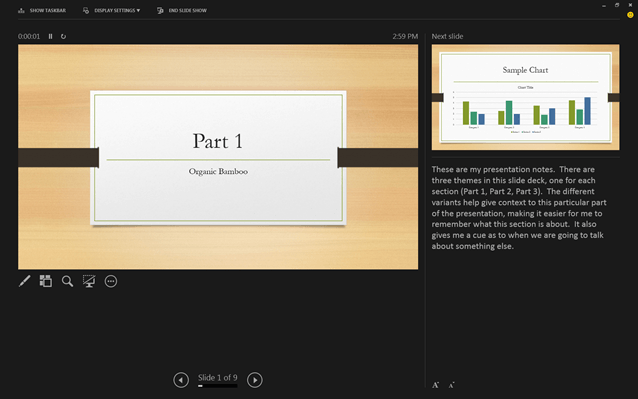
The Presenter View option allows PowerPoint users to show the audience the slide show while giving the presenter a view of upcoming slides, a timer, notes to yourself, and other handy tools. (If you haven’t yet, be sure to give it a try.)

powerpoint-2013-presenter-view

The problem is that every now and then Presenter View doesn’t happen, and the laptop screen only shows the slides. Most people don’t memorize where these controls are, so in this situation, users are often forced to press on without the use of Presenter View. Since this little headache pops up from time to time, it pays to know how to set this option.

For Windows PC Users:use presenter view At the top of the PowerPoint screen are a series of tabs. Click on the one that says Slide Show. In the ribbon’s Monitors section, you will see a check box next to the words Use Presenter View. Check this box and Presenter View will start up when you begin the slideshow.

ppt2011-presenter-viewMac Users: Click on the Slide Show tab and look for a section titled Setting for Two Displays. Click on the icon that says Presenter View, and then start your presentation again.

Mac users may also need to be sure that their laptop is not set to mirror the displays. To do this, click on the Apple icon in the top-left of the desktop, then click on System and choose Display. Click on the Arrangement tab at the top of that screen and be sure that the check box next to Mirror Displays is unchecked.

swap screens ppt2013Lastly, if the Presenter View shows up on the wrong monitor simply click on the Display Settings button at the top of the Presenter Tools page and select Swap Presenter View and Slide Show.

Of course, Classroom Support is always available to help with this. Call us at 214-768-8888, and we’ll be glad to set it up for you.

Why is it So Difficult to Play a DVD? (Part 2)

In part one, we explained how to determine if the problems you have playing movies is the result of a faulty disc. Now it’s time to make sense out of the software that you’ll be using to play your movie. All of the computers in the Dedman College classrooms run Windows 7, and most of the time you will play DVDs using a program called Windows Media Player.

Here is the easiest way to start a movie:

1 – Turn on the computer and log in. (Do not put the disc in yet!)

2 – Wait until you are completely logged on and the desktop has finished loading. Now open the DVD tray and put the disc in.

3 – Wait. It can take a few seconds for the computer to respond.

4 – The Windows Media Player will pop up and try to play your disc.

Most of the time, the film starts playing automatically. It may bring up the disc’s main menu and you will have to click on the Play option, just like you would if you were using a DVD player at home.

Sometimes when you put the disc into the computer, you will be given a choice between different programs. Double-click on ‘Windows Media Player’ when this pops up, and you’ll see the movie start in a few seconds.

Windows Media Player

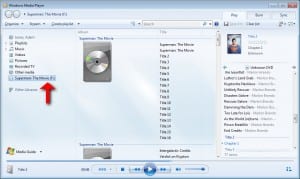
If nothing shows up automatically (or if you put the disc in the drive before you logged in), you can start the movie by clicking on the Windows Media Player icon at the bottom of thescreen. (It’s the orange circle with an arrow in it – like the picture on the right.) When the program opens you should see the name of your disc at the bottom of the left-hand side of the window. Double-click the title, and the movie will start.

If you’d like to see this in more detail, Microsoft has prepared a short video for you. Click here to see it.


The title of the movie will be at the bottom of the list on the left. (Click on this picture for a better view.)

Sounds simple, and most of the time it’s not complicated when you know the right steps. If the movie starts playing right away then the only problem you’ll be likely to run into is that the volume is not turned up. Read this older post to be sure you understand how to deal with that. (We have more calls about volume issues than anything else.)

What if this process doesn’t work? Sometimes, Windows Media Player cannot read certain discs. There are various reasons for this. A DVD of a different region is a common roadblock, and this usually happens when using with discs from other countries. Fortunately, we’ve installed a separate program to deal with these discs.

VLC_icon
VLC Media Player

On the desktop (or in the Faculty Applications folder on the desktop) you’ll see an icon that looks like an orange traffic cone (like the picture on the left) called VLC Media Player. Double-click this icon, and when the program opens navigate to Media in the upper left-hand corner, then click Open Disc. In the next window, click Play. This will start the movie. VLC Media player is not as user-friendly as Windows Media Player, but it will often play discs that have been stubborn and uncooperative in other players.

If you are still concerned about playing your movie, feel free to contact us at help@smu.edu and ask us to help you get it started. We will be happy to show up at the start of your class to make sure the movie starts easily and on time.