Camera RAW

By Moez Janmohammad

Introducing Feature of the Week, where we highlight a feature of a program and give a basic tutorial on how it works. This week we’re focusing on Camera RAW in the Adobe Creative Suite.  Camera RAW is one of the single most powerful tools in a photographer’s arsenal, and often one of the most overlooked tools in the Adobe Creative Suite.  It gives the user extensive control of the post processing of an image, allowing them to edit exposure and distortion before going into Photoshop to make more advanced edits.

Adobe Bridge CC

By Moez Janmohammad

Adobe Bridge is a digital asset management software that allows a user to organize any kind of media. The name Bridge comes from the idea that Adobe Bridge will be the link between all of the programs in the creative suite. From Bridge a user can drop an Illustrator vector image into Photoshop, or an After Effects video into Premiere. This tutorial covers the basic interface of Adobe Bridge, from selecting images, to the filmstrip view, to reading the metadata of a file.

University owned computers can download any of the Master Collection Adobe Creative products via LANDesk. For more informaiton, visit our service page http://www.smu.edu/BusinessFinance/OIT/Services/Info/Adobe.

f.lux: Sleep and Screen Color

f.lux-before-and-after

By Moez Janmohammad

If you’re a college student, chances are you’ve stayed up late to finish an assignment, but have you ever paused to think about your eyes? The bright and blueish lights emitted from most LCD displays mimic bright sunlight and cause a disruption to normal sleep patterns (because we all have normal sleep patterns in college) and inhibit the amount of melatonin, a chemical our bodies produce that causes drowsiness. f.lux seeks to solve this problem by changing the screen temperature of your display to have it emit more red light after sunset. At sunset, f.lux automatically adjusts your display, making whites appear reddish or salmon, matching natural light cycles and our body’s Circadian rhythm.

f.lux is available for Windows, Mac OSX and Linux. It is only available on jailbroken iOS devices, and an Android version is in the works. To get it go to www.justgetflux.com.

f.lux

Photoshop Toolbar

Photoshop_CC_iconBy Moez Janmohammad

Long-time users of Photoshop can look at the icon of any tool on the Photoshop toolbar and tell you exactly what you could use it for, but chances are, the average user only knows what a handful of these tools do. The Photoshop Toolbar makes up almost 80% of anything you could ever need to do in the program, so below is a rundown of most of the tools.

*Tip- Any tool with a small triangle in the bottom right-hand corner has more tools hidden underneath. To reveal, simply click and hold until the hidden tools appear.

  • ToolboxIn the first box are the Selection tools. These allow you to manipulate layers and select objects. The Move tool lets you move objects in the selected layer. To use it, just click and drag.
  • The Rectangular Select tool lets you select areas of a picture, a rectangle by default. To make a perfect square, hold the shift key while drawing the shape. By using the context menus across the top of the screen you can make any shape you want.
  • The Lasso tool allows you to trace the shape of an object and the line will adhere to the hard edge of your object.
  • The Crop tool lets you cut parts of the picture out. It’s useful if there is something on the edge of the frame that you don’t want there.
  • The Eyedropper tool helps you to match the color in specific parts of the image. Just click on a pixel and it will add the color to your paint swatches.
  • The Spot Healing tool allows you to remove blemishes from pictures, including red-eye, acne, dust, and other particles. Photoshop will sample around the area and make it blend in.
  • The Clone Stamp tool duplicates part of an image onto another spot in an image. It’s useful if you want to reposition something, like moving a soccer ball closer to a player in an image.
  • The Gradient tool creates a gradient to cover a whole image from foreground to background. You can use your own colors or choose from Photoshop’s presets.
  • The Blur and Sharpen tools both act like paintbrushes but have different effects on your photo. The Blur tool allows you to blur parts of the photo, and you can choose the strength of the blur, the style, and how much it feathers. The Sharpen tool will remove unnecessary pixels and make the area look sharper.
  • The Type tools allow you to add and manipulate text or shapes in an image. The most commonly used of these is the Text tool which lets you type into an image and create text masks.

To learn more about Photoshop and how to use it, check out the Photoshop tutorials page.

Or, to learn more about downloading Adobe CC on your University-owned computer, visit our service page.

Update: Removed reference to Adobe TV.

What’s behind the Excel Design tab? 5 tips worth knowing.

If you’ve been working with Excel for a while, my guess is that you are probably somewhat familiar with the basics of converting your data into a table. However, you may not be aware of some of the features behind the Design tab.  The Design tab will display anytime you click in a table.Design tab

Here are 5 handy tips worth knowing.  I will review them from right to left.

  1. When you click on the drop down in the Table styles options you’ll see an assortment of Table Styles available to suit your preferences.
  2. If there is a table style you like and you want to add additional customization you can do so by selecting a feature in the Table Style Options section.  I often choose to have items displayed with banded rows (every other row shaded), but sometimes it might be easier on the eye to have banded columns.
  3. total row
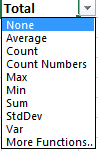
Selecting the Total Row not only adds a total line to your table, but it also has built in functions that you can toggle to further analyze specific data.
  4. Did you know you could add a slicer to filter through data?  Select Slicer, next select what column you want to filter.  In my example, I wanted to view specific types of charges, so I chose the account columns to filter.

Account Next,  select the item you want to filter and the results will be displayed.  filter results

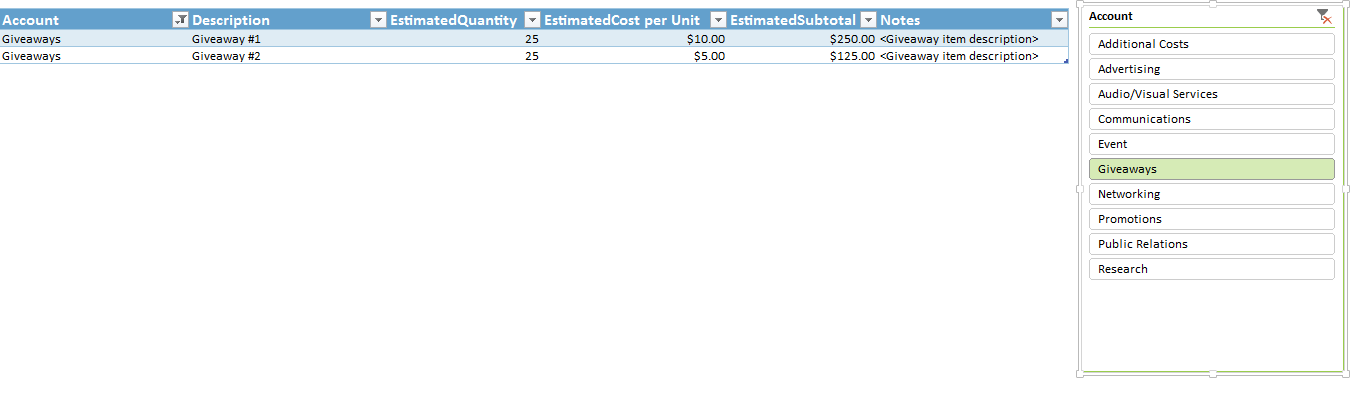
5.  Selecting the Remove Duplicates button will allow you to delete duplicate values. You’ll simply need to tell Excel what column you want the duplicates to be removed from. Oh and by the way, if you remove duplicates from the wrong column, don’t forget the handy Ctrl+Z function to undo your last action!

To learn more Excel tips, check out one of my Basic Formula workshops or Rachel Mulry’s Advanced Excel training.

  smu.edu/BusinessFinance/OIT/Training