Contents
Zoom
What Happens if I Log Out of a Classroom PC Without First Saving my Zoom Recording?
From Steve Sekula: The short answer is: nothing bad happens. Here are the details.
I conducted two experiments. In one, I recorded to the cloud in Zoom, then logged out of the classroom desktop PC without first stopping or pausing the Zoom recording. In the second experiment, I opted to record to the local PC and did the same thing: logged out suddenly, without first saving the recording.
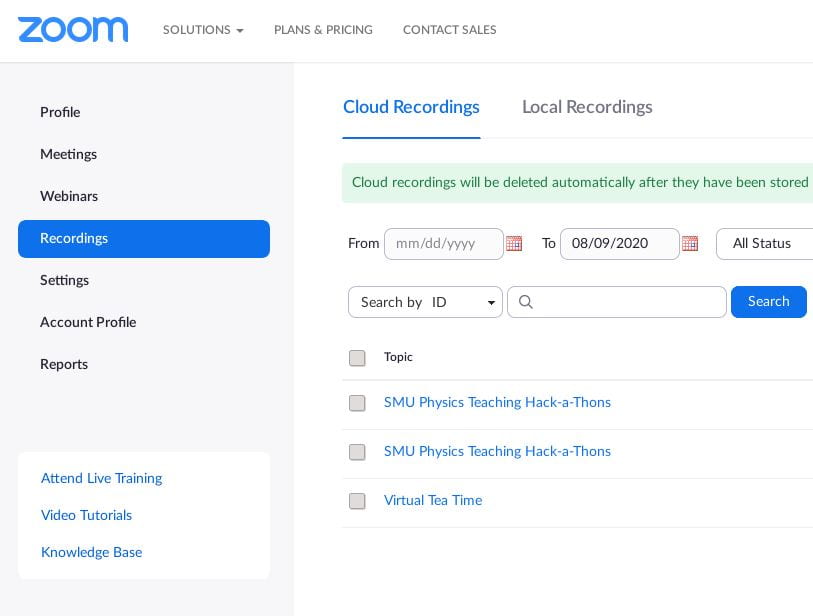
 Cloud Recording: After logging back into the PC, I immediately went to my SMU Zoom recordings page (go to https://smu.zoom.us, log in, and select “My Recordings”). The recordings was there! It had closed safely in the background, even as I disconnected, and was saved and playable in the cloud.
- Local Recordings: After logging back in, I went to the default location where the recordings are saved in Windows (Documents -> Zoom). I saw a folder there for my recording. Inside were a bunch of files that instructed me to click on them to render the recording. I did this, and the computer turned these incomplete files into formal fully functioning movie files. So, on Windows, this worked out fine!
Zoom Breakout Rooms
How can I automate my breakout rooms?
From Jodi Cooley, Allison Deiana, and Steve Sekula: YOu can actually do this fairly easily if you have access to your Class Roster from My.SMU in the “CSV” (comma-separated value) format.
NOTA BENE: as of fall 2020, the linux client does NOT allow automatic breakout room creation using this method. Zoom treats the linux client like the mobile clients: as under-featured. Foo on them.
- Visit My.SMU. Go to your course roster page. Scroll to the bottom of the course roster page and click the “Import Class Roster” button.
- This will email you a CSV file (SRROSTER.CSV). Save that file to disk.
- Edit the file. Change its format to look like the following (the first line is CRUCIAL to the success of the next step, so copy it exactly):
Pre-assign Room Name,Email Address
room1,test1@xxx.com
room1,test2@xxx.com
room2,test3@xxx.com
room2,test4@xxx.com
The first entry from line 2 onward is the name of your breakout room(s) (you make this up), and the second entry is the official SMU-recognized email address of the student (maintain what is in the original roster file). - Now visit https://smu.zoom.us
- Sign in to your SMU Zoom account.
- Click the “Meetings” link on the left-hand side of your account page.
- Click on the meeting for which you wish to pre-assign breakout rooms.
- Scroll down to the bottom of this specific page about your meeting and click “Edit this Meeting”
- Scroll down to the bottom of the meeting’s settings and make sure “Only authenticated users can join” is selected.
- Now select “Breakout Room pre-assign”
- Click the “Import from CSV” option that appears.
- Upload your CSV file.
- Review the breakout room assignments. Make sure all students are listed in their assigned room.
- Click the “Save” button to preserve these settings. This returns to you to the Meeting’s settings page.
- Scroll down and click the “Save” button to save all your new meeting settings, including the breakout room assignments.
The next time your students join your Zoom room and you click “Breakout Rooms,” it should just invite the students automatically to their assigned breakout rooms with no additional work.
Here is more information: https://support.zoom.us/hc/en-us/articles/360032752671-Pre-assigning-Participants-to-Breakout-Rooms
TAs, Co-Hosting and Hosting, and Breakout Rooms
From Jodi Cooley: Only the host can start the breakout room process. If you need TAs (set to be “co-hosts” in Zoom) to them move about in assigned rooms and help students, you first have to assign them to one of the breakout rooms under their responsibility. After that, they are able to change breakout rooms to move themselves around. However, co-hosts cannot do the first initiation of breakout rooms; after they are started, they can move about freely and help out.
Panopto
Faculty Guide: How to Use Panopto (Eva Oberdorster, Biology)
We are so grateful to Professor Eva Oberdorster from the Biology Department for reaching out and sharing with us a faculty-developed guide to using Panopto. It was written by Eva Oberdoerster and Terry Strecker, with help (questions) from many Biology faculty (special thanks to James Pan for all of his help).
Can I Automatically Send Zoom Recordings to Panopto in Canvas?
From Steve Sekula and Durdana Balakishiyeva: Yes. Here are the steps.
- First, visit your Canvas course page (e.g. on https://smu.instructure.com).
- Click on the “Panopto” link in the menu item on the left. If “Panopto” is not a menu item, you need to activate it in your course settings (Settings->Click the “Navigation” Tab at the Top->Drag “Panopto” into the active menu items).
- Click on “My Folder” on the menu on the left side of the Panopto control page.
- Create a folder here for meeting recordings. Mine is called “Meeting Recordings”.
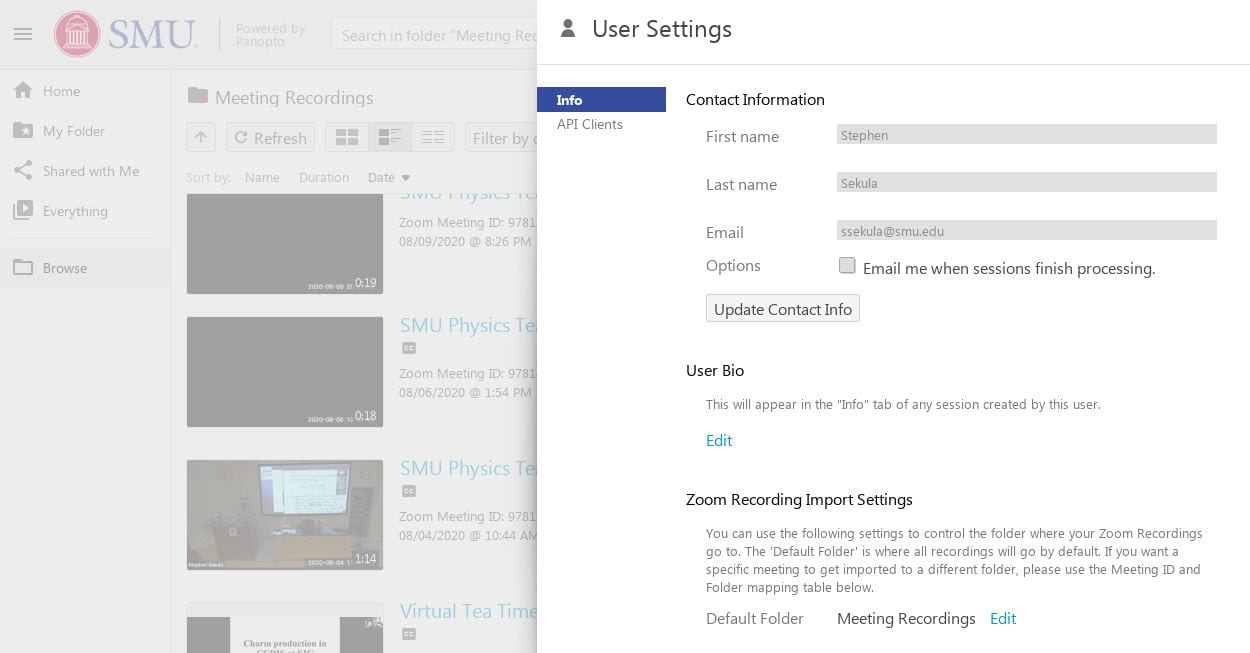
- Now click your name in the upper-right corner of the main Panopto control page. This pops up a dialogue. Select “User Settings” from this dialogue.
 Under the section “Zoom Recording Import Settings” in the user settings, select the folder you just created to hold your Zoom recordings.
Now, when you record a meeting for your class in Zoom using your SMU account, it will be saved automatically to Panopto!
Canvas
Gradebook Tips
From Steve Sekula: By default, the Gradebook in Canvas doesn’t have pre-set policies on late or missing assignments. For example, by default a missing assignment is simply not counted toward the student’s grade, which probably isn’t what you want (the defaults err on the side of being relaxed, not harsh).
You need to establish your policies. To do this…
- Go to the “Grades” menu option, which you can find in the navigation menu on the left side of your course.
- In the upper-right-hand corner of the gradebook you will see a little gear-shaped icon. Click this. It brings up a new menu.
- From this menu, set your default policies on missing or late assignments. For example, I like to make missing assignments default to 0% grades, not 100% grades! I like to penalize lateness by default, so I tend to set that after an hour the grade is 0%.
I also like to make it so that Assignments with a due date are not accessible to the students after a grace period. For instance, if an assignment is due at 09:30am, I like to set the visiblity cutoff to be 10 minutes after that. Then the student can’t even access the assignment to do a late upload, and they are forced to talk to me about their tardiness. You should tune this to your preferences.
Duplicate, Don’t “Copy To…”, Pages and Assignments!
From John Fattaruso: This tip was learned the hard way. If you need to copy a page or assignment so that you can create another page or assignment using the original as a “template,” DON’T use the “Copy To…” option for the page or assignment! Use “Duplicate” instead.

On an individual assignment, click the little “3-dot” menu icon. A menu appears. Select “Duplicate.”
TLDR; “Copy To…” should be used to copy an assignment or page to another course. Copying within a course seems to cause problems. “Duplicate” is for fast-cloning an assignment or page inside a course.
Printing your Canvas Syllabus (or any Canvas content) into a nice PDF File
- Solution from Pavel Nadolsky: Copy and paste your Syllabus content into a Word document (or Pages, Google Doc, LibreOffice, etc.). Then print to PDF. It should preserve all the formatting (headers, bold text, etc.)
- Solution from Steve Sekula: Use a web browser plugin that is designed to allow control over what, on a web page, gets printed to PDF.
- On Firefox, try Print Edit WE.
- On Chrome, try Print Friendly & PDF.
Making One Canvas Module Depend on Things (“Requirements” and “Prerequisites”)
From Steve Sekula: There are actually pretty good existing documentation pages on exactly how to make Canvas Modules “pre-require” previous material (this means that the material builds) or “requirements” (assignments that MUST be done first before new content is unlocked).
- Setting up Pre-Requisites: https://community.canvaslms.com/t5/Instructor-Guide/How-do-I-add-prerequisites-to-a-module/ta-p/1123
- Setting up Requirements: https://community.canvaslms.com/t5/Instructor-Guide/How-do-I-add-requirements-to-a-module/ta-p/1131
Here is a good video on these two ways of controlling flow or defining relationships in Modules:
Setting Up Groups of People in Your Class, and Establishing Group Discussion Forums
From Steve Sekula: here are some good tutorial videos on making groups from a list of people (e.g. students) in a class:
And here is a tutorial video on creating Discussion Boards for asynchronous conversation facilitation and recording:
Tablet Computer Tricks
Displaying your iPad screen in a window on another computer, like a Mac desktop or laptop, or Sharing iPad Screen with Students:
- Solution from Jodi Cooley: tutorial video for iPad and Mac (need a cable): https://smu.box.com/s/ypqpiiiudfhosnfpil1uv90og5kgf0yf
- Solution from Steve Sekula: for Windows or Linux, you can use a non-cable option involving the “AirPlay” technology. Here are some resources:
- Linux: UxPlay
- Windows and Mac: https://www.lonelyscreen.com/index.html
- Claims to work for Mac, too! [NEED TO VERIFY THIS]
- Solution from Durdana Balakishiyeva: The time-saving option during class is having the iPad connected via a cable to the laptop while Zoom is on and using “sharing” option from right inside Zoom itself:
- Click on Share a screen
- Then in the pop up window chose iPhone/iPad via cable. It streams iPad’s screen immediately, without having to pull screens and click anything extra!


