What to Do when PowerPoint’s Presenter View Won’t Play Nice

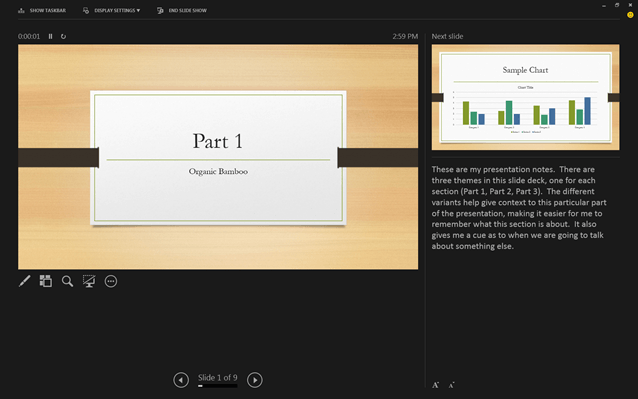
The Presenter View option allows PowerPoint users to show the audience the slide show while giving the presenter a view of upcoming slides, a timer, notes to yourself, and other handy tools. (If you haven’t yet, be sure to give it a try.)

powerpoint-2013-presenter-view

The problem is that every now and then Presenter View doesn’t happen, and the laptop screen only shows the slides. Most people don’t memorize where these controls are, so in this situation, users are often forced to press on without the use of Presenter View. Since this little headache pops up from time to time, it pays to know how to set this option.

For Windows PC Users:use presenter view At the top of the PowerPoint screen are a series of tabs. Click on the one that says Slide Show. In the ribbon’s Monitors section, you will see a check box next to the words Use Presenter View. Check this box and Presenter View will start up when you begin the slideshow.

ppt2011-presenter-view
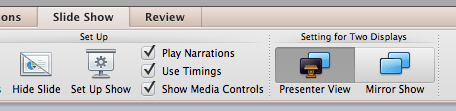
Mac Users: Click on the Slide Show tab and look for a section titled Setting for Two Displays. Click on the icon that says Presenter View, and then start your presentation again.

Mac users may also need to be sure that their laptop is not set to mirror the displays. To do this, click on the Apple icon in the top-left of the desktop, then click on System and choose Display. Click on the Arrangement tab at the top of that screen and be sure that the check box next to Mirror Displays is unchecked.

swap screens ppt2013
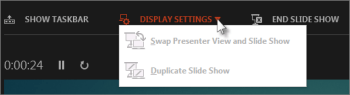
Lastly, if the Presenter View shows up on the wrong monitor simply click on the Display Settings button at the top of the Presenter Tools page and select Swap Presenter View and Slide Show.

Of course, Classroom Support is always available to help with this. Call us at 214-768-8888, and we’ll be glad to set it up for you.

Resist the Urge to Answer the Email Now

Email-client-applicationIt’s so easy to quickly reply to email as soon as you receive it. Consider scheduling times to process email throughout the day. Otherwise, you may end up buried in your inbox! If you are working on a critical project, consider using an Outlook Alert to let others know you won’t be processing email until a specific time. Here are tips to consider when processing email.

  • Delete It
  • Delegate It – Can this be assigned as a task or forwarded?
  • Do It – Will it only take a few minutes to process? Do it now.
  • Delay It – Calendar the item or put on your task list, so you will remember it later.

Interested in learning more about Outlook?

Outlook Productivity Webinar

Wednesday, Feb 4 from 12:00 pm – 1:00 pm

Register

Do you ever feel like you are drowning in email and need some strategies to reduce inbox clutter? The Outlook Productivity session will help you beef up your inbox and calendar skills at the start of the new year! In this session, we will cover a number of time saving tips in Outlook 2013 to manage your electronic communications more effectively.

Learn how to:

  • Create quick steps to process mail in a timely manner
  • Minimize distractions by creating rules and alerts
  • Utilize task features including: categories, custom fields, view settings and more…

Tips for Using Student Email at SMU

CSC-SC2-Tip_2_02Navigate your email with ease

With Office 365, your email is even smarter. Find important messages, communicate confidently, and collaborate with others in real time.

CSC-SC2-Tip_2_05Quickly view your important messages

Take control of your inbox. People View lets you read important messages first—from those you communicate with most often. Expand or collapse this view depending on your needs.

Learn more

CSC-SC2-Tip_2_09Avoid common mistakes

Have you ever selected Reply All to a large group? MailTips warns you about common mistakes before you send an email. Turn MailTips on or off or customize which tips appear.

Learn more

CSC-SC2-Tip_2_13Always share the latest file

Your email is now fully integrated with OneDrive for Business, allowing you to easily share your work with others while always maintaining just one version.

Learn more

CSC-SC2-Tip_2_17Search your email

Find exactly what you’re looking while on the go for by searching your email directly from Outlook Web App. You can search by sender and date and filter to get what you want quickly.

Learn more


Locker.SMU: Migrate Personal Files before March 1

By Rachel Mulry

OITicon-locker2-128x128Locker.SMU will be decommissioned as a service in August 2015. This file storage and sharing application is being replaced by two other services: Microsoft OneDrive and one that is still to be determined. The current locker service has several limitations in storage allocation and cross platform functionality. Therefore, it will be replaced by other services that can address these deficiencies in a cost effective manner.

Project Timeline

  • January 2015: Stop provisioning new accounts in Locker.SMU
  • December 2014-February 2015: Communication and migration assistance for personal storage
  • March 31, 2015: Eliminate personal storage
  • April-June 2015: Migrate Organization storage to new service
  • August 2015: Locker.SMU taken offline

At this time, we are encouraging individuals to begin migrating their personal files off of Locker.SMU. The migration process for your personal files can be done in several ways. Step-by-step instructions are located here.

one driveThere are a number of applications that you may choose to use to continue storing and sharing the files online.  All faculty, staff, and active students have access to Microsoft OneDrive through Office 365. OneDrive provides unlimited data storage and files can easily be shared as well. For more information on using OneDrive or to login, click here.

Please note, the OneDrive license is only available while you are an active faculty, staff, or student. Once you leave the University, the license will expire, and the data will be unavailable. 

Microsoft OneDrive is not the recommended solution for Departmental or Organizational storage. We will provide more details for organizational storage once the new service has been selected.

Email Calendar Availability

Here’s an easy step to send someone your Outlook calendar availability!

  • From the calendar tab, select E-mail Calendar.

email calendar

  • Select the desired Date Range.
  • In the detail section, select the desired availability options you want to share.

availablility

  • Select/deselect the working hours only options.
  • You can choose the layout you prefer by clicking the show button under the advanced section. To close, click ok.
  • An email will then populate with a screenshot of the layout you selected.

Calendar view

calendar viewList View

list view